

The biggest screen isn’t always the best place to start. A successful home cinema setup begins with the room: its dimensions, seating position and light levels help determine which projector and screen will work well together.
It’s easy to focus on equipment first, especially when you’re unsure which components are essential or how they’ll connect. But daylight can make the picture harder to see, and a screen that doesn’t suit the projector or room can limit the result. Planning around what you watch, whether films, sport or games, helps you make practical choices before installation.
This step-by-step guide will help you assess your room, identify the main equipment and check compatibility before you buy. You’ll learn how to match a projector with a suitable screen, plan placement and connections, and test the finished system. Sony, BenQ and LG projectors, as well as ALR and CLR screens, are among the options to compare. The right combination depends on your space and viewing habits, so start with a clear plan.
Key Takeaways
- Map room dimensions, seating, wall space and viewing priorities before choosing equipment.
- Plan projector placement, image size and screen format together, then compare fixed, motorised and floor-rising options for your room.
- Prioritise the core parts of a home cinema setup and decide which optional upgrades suit how you watch.
- Follow a clear installation sequence and check equipment instructions before mounting or routing cables.
- Prepare measurements, a seating plan and equipment details before seeking professional projector-screen installation.
How to plan a home cinema setup around your room
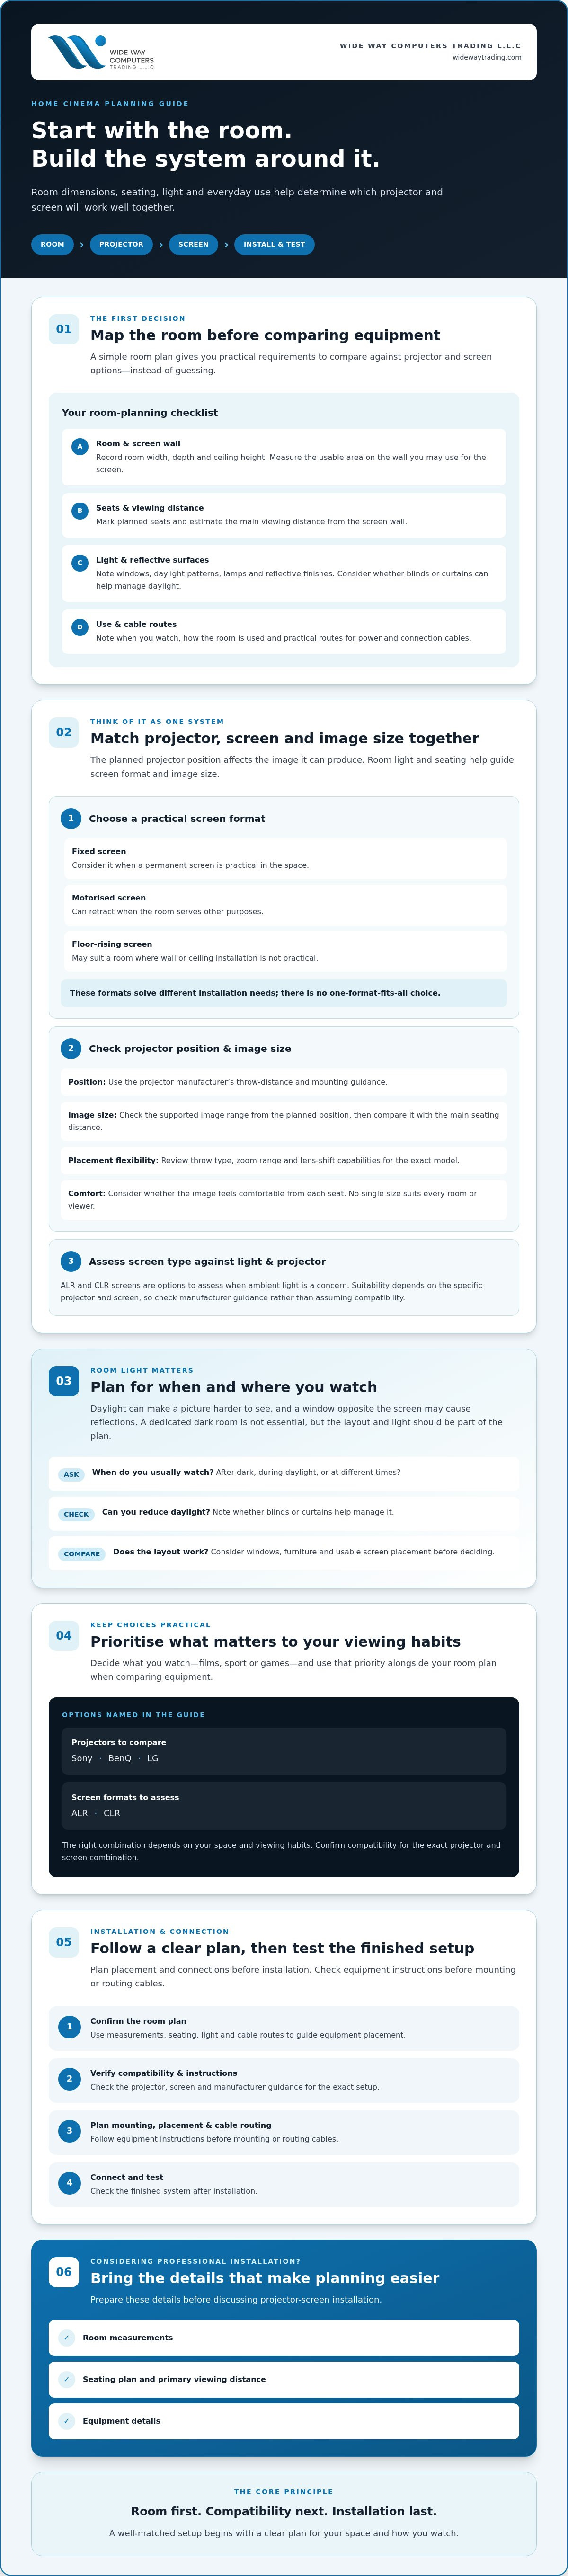
Start with the room, not the equipment. Its dimensions, seating, light and everyday use will shape the screen size and projector placement that make sense. A simple plan helps you compare equipment using the same practical requirements instead of guessing. For background on the concept and typical components, see this overview of what is a home cinema.
Light and viewing distance both affect screen choice. A window opposite the screen may cause reflections or make the image harder to see during daytime viewing. A very large image may also be uncomfortable from a nearby seat. Note when you usually watch and whether blinds or curtains let you manage daylight. Then assess screen options, including ALR and CLR formats, alongside the projector you’re considering. No screen type produces the same result in every room.
What should you measure before choosing home cinema equipment?
Record the room’s width, depth and ceiling height, then measure the usable area on the wall you might use for a screen. Mark each planned seat and estimate the main viewing distance from the screen wall. Note windows, lamps and reflective surfaces such as glossy finishes. Also identify practical routes for power and connection cables. Together, these details help you narrow down screen size, projector placement and installation options before comparing models.
Does a home cinema need a dedicated dark room?
No. A dedicated cinema room can make it easier to manage light and arrange equipment, but projection can also work in a shared living space if you plan around its layout and everyday use. Consider whether you mostly watch after dark, whether you can reduce daylight, and whether windows or furniture restrict screen placement. Picture performance depends on the room and selected equipment, so assess both before deciding.
First-pass room checklist:
- Measure room width, depth, ceiling height and usable screen-wall space.
- Mark seating locations and estimate the primary viewing distance.
- Record window positions, daylight patterns, lamps and reflective surfaces.
- Note how the room is used and when you’re most likely to watch.
- Sketch practical cable routes and identify any layout constraints.
Keep these notes handy when comparing equipment. They give you a practical basis for discussing projector and screen compatibility, including whether specialist screen selection or professional projector-screen installation may suit the room.
How to match a projector, screen and image size
Choose the projector, screen and image size as one system. The projector’s position affects the image it can produce, while room lighting and seating help determine which screen format and image size are suitable. Decide where viewers will sit and where the screen can go before settling on equipment.
How do you choose a projector screen for your room?
Start with available wall space, viewing positions and how the room is used. A fixed screen suits a space where a permanent screen is practical. A motorised screen can retract when the room serves other purposes, while a floor-rising screen may suit a room where wall or ceiling installation is not practical. These formats address different installation needs, rather than offering a universal ranking.
ALR and CLR screens are options to assess when ambient light is a concern, but suitability depends on the specific projector and screen. Check the manufacturers’ guidance rather than assuming a screen will suit every projection angle or setup. For a closer comparison, consult The Ultimate Guide to ALR and CLR Projector Screens.
How should you choose projector placement and image size?
Use the selected projector manufacturer’s throw-distance and mounting guidance to check whether your preferred image size is possible from the planned position. Compare that image size with the main seating distance, then consider whether it feels comfortable from each seat. There’s no single size that works for every room or viewer.
Check the model’s throw type, zoom range and lens-shift capabilities before deciding where to mount it. These specifications affect placement flexibility. Confirm compatibility for the exact projector and screen combination before installation.
| Decision factor | What to check |
|---|---|
| Room light | When daylight or artificial light reaches the screen, and whether it can be controlled. |
| Screen format | Available wall or floor space, room use and installation preferences. |
| Image size | Seating distance and the projector’s supported image range from the intended position. |
| Projector placement | Manufacturer guidance for throw distance, mounting, zoom and lens shift. |
| Screen compatibility | Whether the selected screen is suitable for the exact projector and viewing arrangement. |
Keep the whole room in view as you finalise the plan. Speaker positions also need consideration, and Dolby’s home theater setup guide offers guidance on speaker placement and system choice. To explore screen options or installation, see projector-screen options and installation from WIDE WAY COMPUTERS TRADING L.L.C.
Which home cinema components matter most, and what can you simplify?
Build the system around what you watch and the room you have, not a list of features. A practical home cinema setup connects the picture, playback and sound components, with seating and controls arranged for everyday use. Check compatibility first, then consider upgrades only if they address a real need.
A basic home cinema setup needs a projector, a suitable screen, a compatible playback source and audio, arranged for comfortable viewing and straightforward control.
What equipment do you need for a home cinema setup?
The projector and screen form the picture system, so plan their placement and compatibility together. A playback source might be a streaming device, disc player or game console. Check each device’s documentation to confirm which connections it supports and whether you need particular cables or intermediary equipment.
Choose audio to suit the room layout and your listening preferences. A simple speaker arrangement may be enough for casual viewing, while surround sound needs additional speakers and planning for their positions. Seating affects both the view and listening experience. A basic remote may be sufficient to operate the system; more elaborate controls are optional.
- Start with: projector, compatible screen, playback source and an audio solution.
- Plan around them: seating, power and connection routes, and a practical way to control the equipment.
- Consider later: higher resolution, immersive audio formats or more advanced control, if your content and room support them.
Do you need a 4K projector or immersive audio?
Not necessarily. Resolution and audio formats are choices, not universal requirements. Consider what you watch, the playback source, your viewing distance and the other equipment in your plan. A 4K projector is most relevant if your sources and connected devices can deliver compatible content. Immersive audio also depends on suitable equipment and speaker placement, so assess the complete system rather than choosing a format in isolation.
Projectors from Sony, BenQ and LG are among the available options, but specifications and compatibility vary by model. Compare the manufacturer’s documentation before deciding. The 2026 Sony, BenQ and LG 4K projector comparison can also help structure your research, but verify each model’s current specifications and availability before purchase.
Keep the first version simple. Confirm that every component connects and suits the room, then add upgrades only when they address a viewing or listening priority.
How to install and connect a home cinema setup step by step
A reliable home cinema setup comes together in a deliberate order: confirm the layout, position the equipment, connect devices, configure settings, then test the complete system. Before drilling or concealing cables, check the projector’s throw guidance, screen position and mounting instructions for the exact equipment.
How do you position and connect the equipment?
Mark the intended screen area and projector position, then compare them with the manufacturer’s throw-distance and mounting guidance. Check that the mount suits the selected projector and installation point. If you’re unsure about the mounting position, supporting surface or installation method, pause before drilling and consult a qualified installer.
Plan routes for power and signal cables. Keep connections accessible for adjustments, and avoid routes where cables could be pinched, damaged or become a trip hazard. Allow the projector and other equipment the ventilation clearance specified by their manufacturers. Don’t place devices in enclosed spaces unless their instructions allow it.
Connect the playback source, projector and audio equipment according to their documentation. Confirm that the ports, cables and connection standards match across the devices. Specifications can differ by model, so check current manufacturer information rather than assuming similarly named connections support the same features.
What should you test before regular viewing?
Power up the system and check the picture before tidying or concealing cables. Confirm that the image is in focus, aligned with the screen and fully within its viewing area. Look for obstructions, such as a light fitting or décor crossing the projected image. Make adjustments using the projector’s approved setup controls and instructions.
Next, play content from each source you expect to use. Check that audio reaches the intended speakers, remote controls work, and you can switch between sources without losing picture or sound. Test the system from the main seating position, not only beside the equipment.
- Confirm projector and screen positions before mounting.
- Check cable connections, equipment access and ventilation.
- Test focus, alignment, full screen coverage and clear sightlines.
- Verify playback, audio routing, remote response and source switching.
- Record the final settings and connection layout for future reference.
In short: confirm the layout, position the equipment, connect devices, configure settings and test picture, sound and controls. Keep the manufacturer’s instructions available throughout. If mounting or compatibility remains uncertain, professional projector-screen installation can help bring the planned arrangement together. Arrange professional projector-screen installation for your setup.
When to get professional help with your home cinema setup
Professional help can be useful when a projector needs ceiling mounting, cable routes are complex, or the room makes screen placement difficult. The projector position, screen alignment and access to equipment all need to work together. If you’re unsure about a mounting point or whether your components are compatible, get advice before drilling or concealing cables.
WIDE WAY COMPUTERS TRADING L.L.C supplies projectors from Sony, BenQ and LG, along with projector screens, including ALR and CLR options, and motorised cinema screens. The company also provides professional projector-screen installation. Confirm the scope of any proposed work directly, particularly if your plan includes projector mounting, cabling or other tasks beyond screen installation.
What should you ask a projector-screen installer?
Ask how the proposed screen suits the room, projector and intended installation position. Check that placement and compatibility assumptions are based on the exact equipment and its manufacturer guidance. Before agreeing to a service, clarify what the installation includes and excludes, such as separate mounting or cable work. Clear expectations help you plan the remaining steps without assuming they’re part of the screen installation.
How can you make the next step straightforward?
Prepare a concise brief before discussing your project. Include room dimensions, a seating plan, photographs of the screen wall and ceiling, the projector make and model if selected, and your viewing priorities. Note constraints such as limited wall space, windows, existing furniture or preferred cable routes. If you haven’t chosen equipment, describe the room and the screen format you’re considering instead.
Bring the details together in a short checklist:
- Room measurements and clear photos of the proposed installation area.
- Seating positions and the main viewing requirements.
- Projector details, if selected, plus the screen format you’re considering.
- Any mounting, access or cable-routing constraints you already know about.
This preparation makes it easier to discuss screen suitability and installation requirements without guessing. For projector options, screen formats and professional projector-screen installation, explore projectors and screen solutions from WIDE WAY COMPUTERS TRADING L.L.C.
Bring Your Home Cinema Plan Together
A dependable home cinema setup starts with your room, not a shopping list. Measure the space, consider seating and light, then match projector placement, image size and screen choice. Keep the core system practical: compatible picture and playback equipment, audio suited to your listening habits, and a layout you can install and operate with confidence.
Check manufacturer guidance before mounting or connecting equipment, and test picture, sound and controls before regular viewing. If ceiling mounting, cable routes or screen placement feel uncertain, professional projector-screen installation can help you move forward with a clear plan.
WIDE WAY COMPUTERS TRADING L.L.C supplies projectors from Sony, BenQ and LG, with ALR and CLR screen options to consider for different room conditions. Explore projectors and screen solutions and take the next step toward a system that fits your space and viewing priorities.
Start with the room, make each choice deliberately, and enjoy building a cinema experience that feels right at home.
Frequently Asked Questions
How do I set up a home cinema in a living room?
To set up a home cinema in a living room, start by measuring the space, marking the main seating position and noting windows, lamps and other light sources. Choose the projector and screen as a pair, then plan equipment placement, cable routes and audio around the room’s everyday use. A shared space may need different screen and light-control choices from a dedicated cinema room. Check each device’s installation documentation before connecting or mounting equipment.
How far should a projector be from the screen?
There’s no universal projector-to-screen distance. The right position depends on the exact projector’s throw ratio, desired image size and lens features. Consult the manufacturer’s throw-distance guidance for your model before choosing a mount location. Short-throw and standard-throw projectors have different placement needs, so don’t treat another projector’s measurements as a guarantee. Check the full setup against the screen position and room layout before installation.
Is an ALR screen suitable for every home cinema?
No. An ambient-light-rejecting screen isn’t automatically suitable for every projector or room. Consider the screen design alongside projector type, viewing position and the room’s light conditions, then check compatibility for the exact equipment you plan to use. ALR and CLR options address different setup considerations, so compare their requirements rather than choosing by name alone. A detailed ALR and CLR screen guide can help you assess the differences.
Can you install a projector without professional help?
Some simple setups may be manageable if you’re confident and follow the equipment instructions. Ceiling mounting, complex cable routes or uncertain compatibility can make professional support a sensible option. Before drilling, confirm that the mount suits the projector and intended position, and follow the manufacturer’s guidance. WIDE WAY COMPUTERS TRADING L.L.C offers professional projector-screen installation. Check what work is included before agreeing to an installation service.
How do I improve a home cinema picture without replacing the projector?
Check focus, image alignment and screen coverage first, then look for obstructions and consider whether room light is affecting the picture. Review the playback source settings and confirm that its resolution and connection are supported by the projector. Follow the manufacturers’ instructions for any adjustments. Results depend on the room and devices, so no single setting guarantees a better picture across every system.


