

What if the best projector position isn’t the one that looks easiest to install? A projector installation service should start by checking the room, screen size, throw distance, lighting, and connections, not simply choosing a spot on the ceiling. Get that fit wrong and the picture, cable route, or viewing comfort can suffer.
It’s reasonable to expect a professional setup to reduce guesswork, but service scope varies. Screen installation doesn’t automatically include projector mounting, concealed cabling, calibration, or source configuration. Confirm what’s covered before booking, and check that the projector and screen suit the room and each other.
This UAE guide for 2026 explains what to prepare before requesting an installation, what to expect during assessment, installation, testing, and handover, and how to compare providers. You’ll also learn which equipment details and room measurements help an installer recommend a suitable setup. Clear scope matters, as does equipment fit.
Key Takeaways
- A projector installation service can cover different tasks, so confirm whether mounting, cabling, setup, and testing are included.
- Record room dimensions, seating, screen position, and ambient light to help assess placement and viewing conditions.
- Check the projector manufacturer’s throw-distance and lens specifications before settling on a screen position.
- DIY may suit a straightforward setup; more complex rooms can benefit from professional assessment and installation.
- Prepare equipment details, intended use, and site constraints, then confirm the work scope and handover steps before the appointment.
Projector Installation Service: What Professional Setup Can Cover
A projector installation service is an agreed set of tasks for assessing a room, positioning projection equipment, and connecting or testing components for the intended use. Depending on the provider and the job, it may include a site assessment, projector positioning, screen alignment, cable routing, setup, and testing. Treat these as tasks to confirm, not a standard package.
Equipment supply and installation are separate. Buying a projector or screen doesn’t automatically include fitting it, and a screen installation service doesn’t necessarily cover mounting the projector. A provider that supplies audiovisual equipment and installs screens may be able to discuss how the components work together. Confirm which specific tasks are included before booking.
What may be included in a projector installation
For a typical room, the installer may assess the intended screen position and viewing area, then check where the projector can sit to produce the desired image. Screen alignment matters: if the screen and projector aren’t positioned in relation to each other, the picture may appear off-centre or poorly framed. The projector’s technology and specifications also affect setup. This overview of video projector technology explains key types and terminology.
Cable routing depends on the room, existing connections, and agreed work. Concealing cables may require a different approach from connecting equipment along an accessible route. Ask the provider to state whether the following are included:
- Projector mounting, or only projector placement
- Projector-screen installation and alignment
- Cable routing or concealment
- Connecting source devices, setup, and image testing
Confirming these details prevents assumptions, especially if the offer covers screen installation but projector mounting is not specified.
When professional installation is worth considering
A simple shelf setup with accessible connections may be manageable as a DIY project. Professional help can be useful when the plan involves ceiling placement, long cable runs, a fixed screen position, or precise alignment. These conditions can make it harder to adjust the image or troubleshoot connections after the equipment is in place.
Before choosing a projector, compare its capabilities with the room and screen requirements. The 4K projector comparison guide can help you review options from Sony, BenQ, and LG. Check the manufacturer’s specifications for the model you’re considering, then confirm with the installer what work they’ll perform. A clear scope helps prevent avoidable placement and connection errors while making responsibility for each task explicit.
Assess the Room Before Booking Projector Installation
A useful room assessment starts with what you can observe and measure. Record the room’s length, width, and ceiling height, then note the intended screen wall, seating positions, windows, and light sources. These details help an installer assess possible projector positions and whether the screen size and placement suit how you’ll use the room.
A projector and screen should be selected to fit the room’s dimensions, light conditions, seating, and connection needs. That fit matters more than choosing equipment by a single specification. Share your notes with a projector installation service so the discussion can focus on practical placement rather than guesswork.
Check viewing distance, throw distance, and screen position
Throw distance is the space between the projector lens and the screen. The usable range depends on the projector model and its lens capabilities, so don’t assume a position that works for one projector will work for another. Check the manufacturer’s throw specifications for the exact model and compare them with the distance available in your room. In a compact room, a short-throw projector screen guide can help you understand this setup option.
Also note where viewers will sit and whether furniture, doors, or ceiling features could obstruct the image or installation position. A simple room sketch with measurements and the preferred screen location can make an initial assessment more useful.
Account for ambient light and screen characteristics
Daylight from windows and light from lamps can affect perceived contrast, particularly when the room is bright during viewing. Record when you expect to use the projector and whether curtains or blinds are available. This gives the installer useful context for discussing screen placement and suitable screen characteristics.
ALR (ambient light rejecting) and CLR (ceiling light rejecting) describe screen categories, not guaranteed solutions for every room. Their suitability depends on the projector, light sources, viewing position, and screen placement. Discuss those conditions before settling on a screen. A category name alone can’t confirm that it will perform as intended.
Map power, sources, and cable paths
Before the visit, identify nearby power access, the devices you plan to connect, and the connection types each device uses. Note existing cable routes and whether you prefer cables to remain accessible or be concealed. Concealment depends on the room and agreed work, so include this preference when confirming the scope.
Clear planning supports a more accurate assessment. AVIXA provides a reference point for industry installation standards; for your own project, confirm which installation tasks and site requirements apply to the agreed setup.
Professional Projector Installation vs DIY Setup
DIY can be a sensible choice for a straightforward setup. If the projector can sit securely on an accessible shelf, the screen is already positioned, and your source devices connect without complicated cable runs, you may be able to follow the manufacturers’ instructions and complete the setup yourself.
A fixed ceiling position changes the calculation. Mounting location, alignment, cable routing, and access for future adjustments all need consideration. Wall or ceiling mounting may require a separate site assessment and suitable hardware. Don’t assume that a projector-screen installation service includes projector mounting, or that a projector installation service covers configuration and follow-up checks. Confirm who supplies the equipment and who is responsible for each task.
| Task | DIY setup | Professional setup |
|---|---|---|
| Placement and alignment | You choose the position and adjust the image using the manufacturer’s guidance. | Ask whether the agreed work includes positioning and checking alignment against the screen. |
| Cable planning | You identify connection types and manage accessible cable routes. | Confirm whether routing or concealment is included and how the room affects the plan. |
| Configuration and testing | You connect sources and check each device yourself. | Agree which sources will be connected and what image or connection checks will be performed. |
| Customer effort | You handle planning, setup, adjustment, and troubleshooting. | You provide room and equipment details, then confirm the scope and review the handover. |
Choose based on room complexity
The right option depends on the work involved, not on a rule that every projector needs an installer. A shelf-mounted unit with accessible power and a single source may be manageable independently. A ceiling-mounted projector, concealed cabling, multiple sources, or difficult screen alignment can make planning and troubleshooting more involved.
If you choose DIY, follow the projector and screen manufacturers’ instructions, including their guidance on placement and mounting. If you hire help, ask how the installer will check image position and test connected sources. A clear written scope should distinguish equipment supply from installation and specify whether mounting, configuration, and post-installation checks are included. AVIXA’s industry standards offer a useful reference point for audiovisual practice, but confirm the specific work agreed for your room.
For a setup that calls for professional input, compare your equipment and screen requirements with the provider’s confirmed offer. You can explore WIDE WAY COMPUTERS TRADING L.L.C audiovisual solutions as one starting point, then clarify the installation scope before making arrangements.
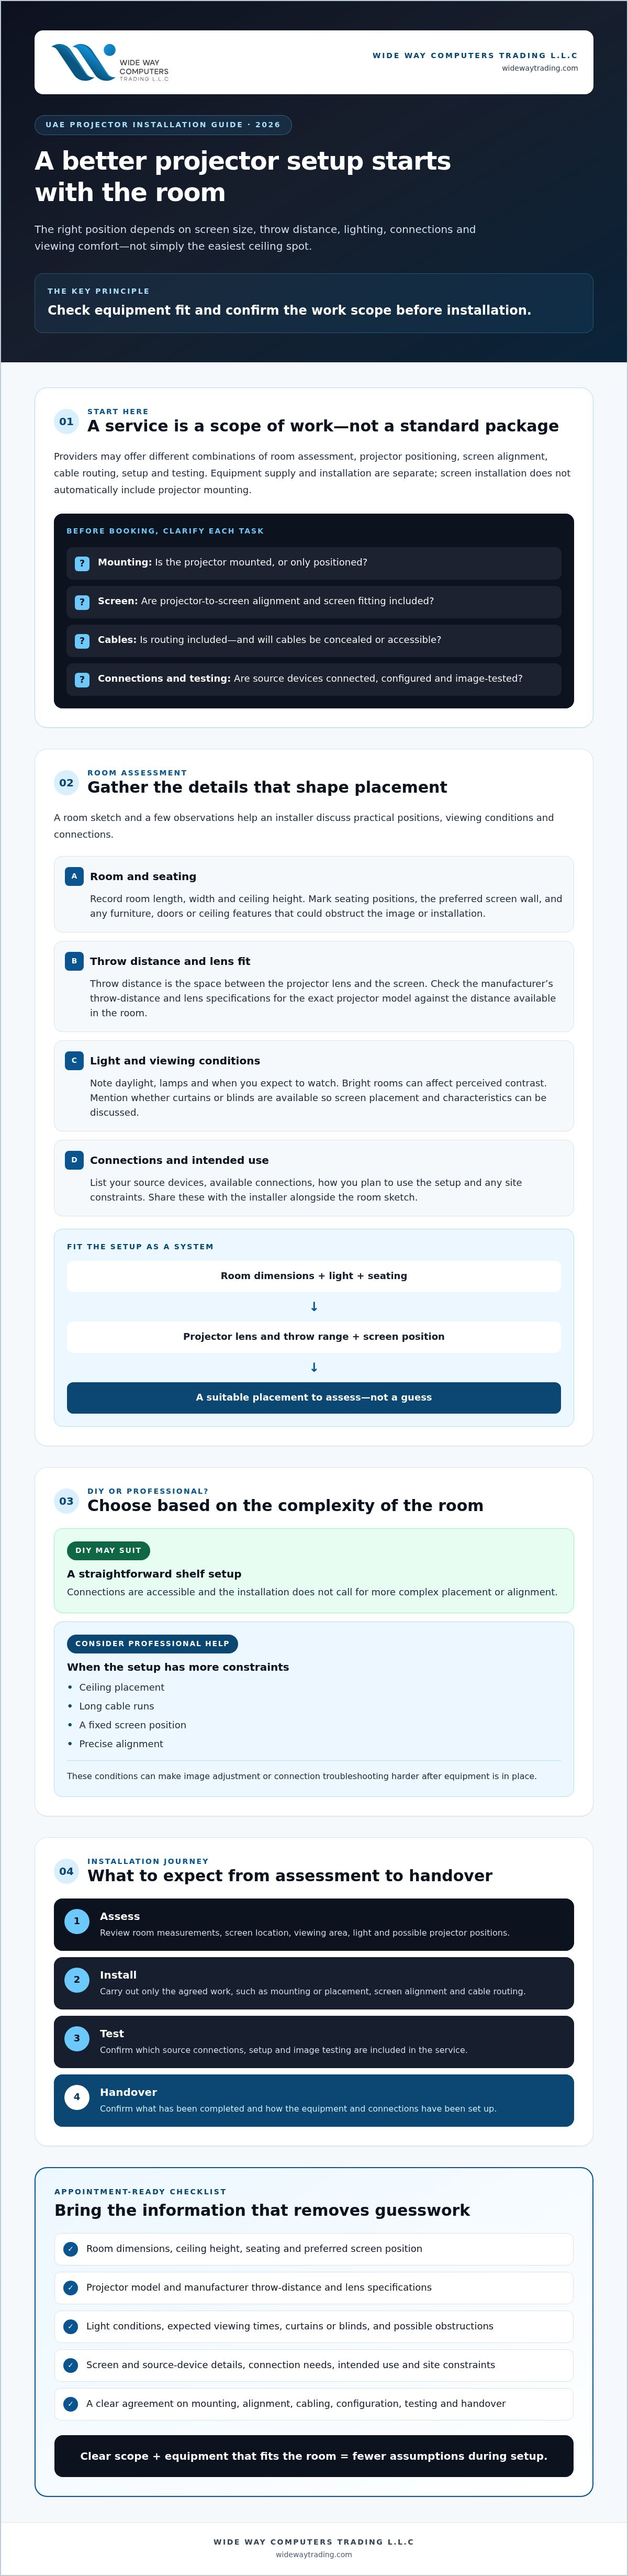
How to Prepare for a Projector Installation Appointment
A little preparation helps the installer assess the room and clarify the work before the appointment. Share what you know, flag what you’re unsure about, and avoid assuming that mounting or cabling is included. Final placement depends on the room, the equipment specifications, and the agreed service scope.
Information to share before the visit
Use this sequence to prepare a practical project brief for your projector installation service:
- Describe the room. Share room dimensions, photos from different angles, seating positions, and your preferred screen location. Include windows, ceiling features, or other visible obstacles.
- Identify the equipment. Provide the projector and screen make and model, if known. List source devices such as a laptop or media player, along with the inputs they require.
- Note power and cable details. Point out nearby power outlets, existing cables, and any preferred cable paths. Say whether you want cables concealed or kept accessible, while recognizing that the room may affect what’s practical.
- Explain the intended use. Tell the installer what you plan to display and how the room will typically be used. This context can help guide placement and connection discussions.
- Flag access and site constraints. Mention restricted access, fixed furniture, or other conditions that could affect the work. If building-management approval or permission may apply, check the relevant requirements before the appointment.
Model details are especially useful. Projectors can differ in throw distance, lens capabilities, and connections, so the exact equipment helps the installer assess possible positions. Photos and measurements inform that assessment, but they don’t replace checking the product specifications or confirming the final plan on site.
Questions to confirm with the installer
Before approving the work, ask for a clear breakdown of what’s included, excluded, or dependent on the site assessment. Specifically confirm whether the service covers projector mounting, screen installation, mounting hardware, cable supply or routing, configuration, and testing. Ask who supplies each component, including cables or hardware, and whether the installer will check the image position and test your connected sources.
Keep the answers together in writing. This makes responsibilities clearer if the room conditions or equipment differ from what was expected. It also helps prevent a screen installation from being mistaken for projector mounting or a complete setup. If the exact screen or projector model isn’t confirmed yet, state that early so the plan can account for the final equipment.
Once you’ve gathered your room and equipment details, discuss projector and screen options with WIDE WAY COMPUTERS TRADING L.L.C and confirm the installation scope before arranging the work.
What to Expect from a Projector Installation Service and Handover
A well-defined projector installation service follows an agreed sequence, but the exact work and timing depend on the confirmed scope, equipment, and site conditions. Before work begins, review what will be installed, who is supplying each component, and which tasks are included. The installer can then assess the room and check the proposed equipment positions against the site.
Next comes installation of the agreed equipment, followed by testing and a handover. This may involve setting up the screen or projector, connecting specified sources, and checking the projected image, if those tasks are part of the service. Ask for any limits or site-dependent work to be explained before the appointment rather than assuming it is covered.
Installation checks before sign-off
Make time to review the setup with the installer before signing off. Check that the image is focused, framed, and aligned with the screen. Test each source device included in the agreed scope, and verify that the selected input displays correctly. If a device hasn’t been included for testing, ask what you’ll need to connect or check yourself.
Review the visible cable route and confirm it matches the agreed plan. Ask for a brief walkthrough of basic controls, such as selecting an input and adjusting the image using the available controls. Raise any issue while the installer is present and clarify whether adjustments fall within the agreed work.
Choosing a UAE audiovisual installation provider
Look for a written scope that identifies the equipment, installation tasks, exclusions, and checks at handover. Relevant familiarity with your projector and screen can make equipment discussions more specific; ask how the provider will verify image position and connected sources. Clear, responsive communication matters, especially if the room assessment changes the proposed approach.
Confirm that the provider’s installation service covers your location in the UAE rather than assuming equipment supply and installation have the same coverage. If you’re still comparing projector light sources, this laser projector technology guide offers background for that discussion. Check the manufacturer’s specifications for any model under consideration, and confirm current equipment details with the provider.
Before approving the work, make sure you understand what will happen, what will be tested, and what the handover includes. To discuss your room, equipment, and projector installation requirements, contact WIDE WAY COMPUTERS TRADING L.L.C and ask for the proposed scope in clear terms.
Plan a Setup That Fits Your Room
A successful projector setup starts with room and equipment fit, not simply choosing a ceiling or shelf position. Measure the space, note the screen location and seating, and check the projector’s specifications. Just as important, agree on the service scope in advance. Mounting, cabling, configuration, and testing may be separate tasks, so confirm what’s included before work begins.
WIDE WAY COMPUTERS TRADING L.L.C supplies projectors from Sony, BenQ, and LG, and offers projector-screen installation. Its screen range includes ALR, CLR, and motorized cinema options. The right combination depends on your room, lighting, viewing position, and equipment requirements. Confirm current product details and the specific installation responsibilities when discussing your plans.
A clear handover gives you the chance to check image focus and framing, test the agreed source devices, and understand the basic controls. To talk through your room, equipment, and installation requirements, discuss your projector installation requirements with WIDE WAY COMPUTERS TRADING L.L.C. With the scope established and the equipment suited to the space, you can move ahead with greater confidence.
Frequently Asked Questions
What does a projector installation service include?
A projector installation service may include a room assessment, equipment positioning, screen alignment, cable routing, setup, and testing. The exact scope varies by provider and project. Equipment supply is separate from installation, and projector mounting isn’t automatically included with projector-screen installation. Before confirming work, ask which tasks are covered, who supplies the projector, screen, cables, and mounting hardware, and which connected devices will be tested.
How long does professional projector installation take?
There’s no single installation time that applies to every room. The duration depends on the confirmed work, site conditions, equipment, cable routes, and whether the plan involves shelf placement or ceiling mounting. A straightforward setup may involve fewer tasks than one requiring concealed cabling or several source devices. Share room details and equipment models when requesting an estimate, and ask the provider to explain what the proposed timing includes.
Can a projector be installed in any room?
Not every room will suit every projector and screen combination. Room dimensions, available throw distance, screen position, ambient light, seating, power access, and connections all affect the options. Check the manufacturer’s specifications for the projector model, then compare them with the space and intended viewing position. An assessment can help establish whether the proposed setup is practical and identify adjustments that may be needed.
Do I need a professional to mount a projector on the ceiling?
Not in every case, but ceiling mounting calls for careful planning. The position must suit the projector’s specifications and screen, while the mounting hardware must be appropriate for the installation surface. Follow manufacturer instructions, and don’t assume a general projector installation service includes mounting. Ask the provider whether they assess the proposed position, supply or fit mounting hardware, and handle any related cable routing.
Does projector installation include the screen and cabling?
It depends on the provider’s written scope. Screen supply, projector-screen installation, projector mounting, cable supply, routing, and concealment may be separate tasks. Confirm each item before booking, including who provides components and whether the installer will connect and test your source devices. WIDE WAY offers projector-screen installation, but confirm whether projector mounting, cabling, configuration, and testing are included in the specific service you’re considering.
How do I prepare my room for projector installation?
Share the room dimensions, photos, seating positions, and preferred screen location. Identify the projector and screen models, source devices, required inputs, nearby power points, existing cables, and preferred cable routes. Note visible obstacles, access constraints, and how you plan to use the setup. These details help the provider assess the room, but final placement should still be checked against the equipment specifications and agreed work scope.
What should I check before signing off on a projector installation?
Check that the image is focused, framed, and aligned with the screen. Test each source device included in the agreed scope and confirm the correct input works. Review the cable route, then ask for a quick walkthrough of basic controls, such as switching inputs. Before signing off, raise any issues and clarify which adjustments are included. Keep the agreed scope and handover details for reference.


